Easy Installation Guide Building Your Website with LAMP Stack on Debian 8
· 10 min read
Introduction
The LAMP stack is like a super toolbox for building websites and apps. It's made up of Linux (the operating system), Apache (the web server), MySQL (a database), and PHP (a scripting language). When you put all these tools together, your computer becomes a superhero that can host cool and dynamic websites.
In this guide, we'll help you set up the LAMP stack on a Debian 8 server. Let's get started!
Debian 8 Setup Guide
Before we start, make sure you have a Debian 8 server and a special user account that can do important things (we call it 'sudo-enabled'). If you haven't set this up yet, no worries! Just check out our simple guide at the beginning.
Also, it's like putting a protective shield around your server by creating a basic firewall. We'll show you how to do that in an easy step-by-step tutorial. You can find it in our guide for setting up Ubuntu and Debian, and it's really simple to follow!
Step 1 — Getting the Latest Updates
Before adding any new programs, let's make sure your system is all caught up. To do that, type:
sudo apt-get updateThis command checks if there are any newer versions of the software on your computer. It's like looking for updates to make sure you have the latest and greatest stuff from the place where your computer gets its software.
If your server is important for work or projects, be careful when updating. Check each update to make sure it's really needed for your computer. In our example, we installed everything just for this tutorial.Once you're sure the updates are necessary, go ahead and update your server using the command below:
If you decide the updates are important for your computer, go ahead and update your server. Just type in the following command:
sudo apt-get dist-upgradeThis process might take a bit, depending on your computer's setup and internet speed. If it's a new server, it should be quick, just a few seconds.
Now your computer is all updated and ready for the next step – installing the Apache web server to handle your internet connections. Let's get started!
Now your computer is all updated and ready for the next step – installing the Apache web server to handle your internet connections. Let's get started!
Step 2 — Putting Apache and updating the firewall in place
Now, let's move on to the next step of setting up our LAMP stack: installing the Apache web server. Apache is a popular and trusted web server that helps your computer show web pages. To install Apache, just type this command:
sudo apt-get install apache2 apache2-docThis will install the basic Apache web server along with its documentation. It might take a little bit as it sets everything up. Once it's finished, apt-get will let you know, and that's it!
Now, if you've set up a firewall using UFW like we showed you before, you need to make sure it allows traffic for web browsing.
On Debian 8, UFW comes with pre-made settings for apps, making it easy to adjust your firewall. To see all the app profiles available, just run this command:
sudo ufw app listThese WWW profiles help control the ports used by web servers:
Output
Available applications:
. . .
WWW
WWW Cache
WWW Full
WWW Secure
. . .
If you look at the WWW Full profile, it's like a set of instructions that says it allows traffic to go through on ports 80 and 443:
sudo ufw app info "WWW Full"Output
Profile: WWW Full
Title: Web Server (HTTP,HTTPS)
Description: Web Server (HTTP,HTTPS)
Ports:
80,443/tcp
Let data come into your computer for web browsing. This profile lets you allow incoming traffic for both regular web (HTTP) and secure web (HTTPS) connections.
sudo ufw allow in “WWW Full”Now that we've given permission for internet traffic through our security wall, let's check if our web server is working by making sure it can show a simple web page. First, find the address of your server. To do this, type the following command in the terminal you're using to connect to your server:
sudo ifconfig eth0Look at your screen, and you'll see some lines of information. We're interested in finding your server's address, which is like its home on the internet. Look for a number that has four parts separated by dots (like xxx.xxx.xxx.xxx). It usually comes after the words "inet addr:" in the output. That's your server's IP address!
Output
inet addr:111.111.111.111
Remember the number you found (the IP address)? Now, open your web browser, like the one you use to visit websites and type that number into the address bar at the top, just like you do when you visit any other website. Press Enter, and let's see if your server responds!
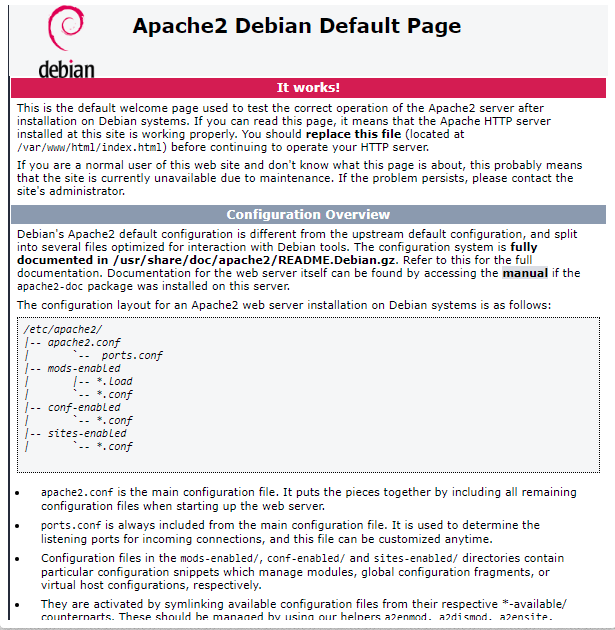
http://111.111.111.111Once you're finished, you'll see the basic Apache 2 web page, like this:

Now that Apache is installed on your server, you can put your website's content in the /var/www/html folder. If you want to make more than one website, you can learn how with virtual hosts in this guide.
For more help and tips on keeping your Apache server secure, check out Debian’s Apache information.
With your web server set up, you're ready to create a spot for your website's data. You can do this using MySQL
Step 3: Configuring MySQL and securing it
Now, let's talk about MySQL. This is like a digital filing cabinet for your website. It helps store and organize all the information your site needs to run smoothly. Lots of popular software, like WordPress and Joomla, rely on MySQL to work.
To get MySQL installed and ready to go with PHP support, just follow these steps:
sudo apt-get install mysql-server php5-mysqlThis will set up MySQL and install everything else it needs. During the installation, you'll be asked to create a new password for the main MySQL user, called "root." Just choose a strong password and remember it!
After setting up MySQL, remember that "root" is the special username used for important tasks, like managing your database. Choose a strong password for it, with a mix of letters and numbers.
Once you've done this, your MySQL installation is complete.
To make sure your database server stays safe, you'll need to run one more script. Just follow these steps:
sudo mysql_secure_installationNow, the script will ask you some questions. When it asks, type in the password you set for the root MySQL account. Then, the system will ask you:
Interactive
Change the root password? [Y/n] n
Since you've already set the password for the root MySQL account during installation, you can just say "no" when it asks. After that, the script will then ask:
Interactive
Remove anonymous users? [Y/n] y
Choose "yes" to remove the anonymous users option for safety.
Next, you'll be asked whether to allow or disallow remote logins for the root account. For safety reasons, it's best to disallow remote logins for root unless absolutely necessary for your setup
Then, you'll be prompted to remove the test database and reload the privilege tables. Respond with "yes" to both of these. This will get rid of the test database and apply the security changes.
Once everything is done correctly, the script will confirm with:
Output
All done!  If you have completed all of the above steps, your MySQL installation should now be secure.
Let's make sure our new MySQL server is up and running. Just type in this command:
mysql -u root -pNow, enter the password you chose for MySQL during the installation process. Remember, this is different from the main root account used for server administration. Once you're in, just type the following to check the server status, version information, and more:
statusThis is a great way to confirm that MySQL is installed and ready for more setup. Once you're done checking the information, simply exit the application by typing:
exitOnce you've made sure that MySQL is up and running, the next thing to do is install PHP. This will allow you to run scripts and handle code on your server
Step 4: Adding PHP Support
Now, let's install PHP. PHP stands for PHP: Hypertext Preprocessor. It's a widely used scripting language that's crucial for creating dynamic web content, which many developers rely on.
To install PHP, just follow these steps:
sudo apt-get install php5-common libapache2-mod-php5 php5-cliOnce you've agreed to the installation, PHP will be added to your server. You'll notice several packages being installed, not just PHP. No need to worry, though. Your system is simply making sure PHP works smoothly with your Apache2 setup and other programs.
To apply all the changes from the PHP installation, it's important to restart Apache on your server. Just follow these steps:
sudo service apache2 restartNow, let’s check if the PHP software is working properly after installation. Go to the folder where your website's files are stored:
cd /var/www/htmlOnce you're in the public web directory, open a text editor from your computer. Create a new file named info.php using the following steps:
sudo nano info.phpThis command will open a simple text editor called nano and create a new blank file with the name "info.php." In this file, you'll type some code to display information about your PHP configuration on a web page. Here's how to do it:
<?php phpinfo(); ?>To save your changes and exit the file, press CTRL-X, then press Y to confirm saving, and finally press ENTER to confirm the file name.
Now, to see the configuration information, open your web browser and type in the following URL, but make sure to replace the highlighted part with your server’s IP address:
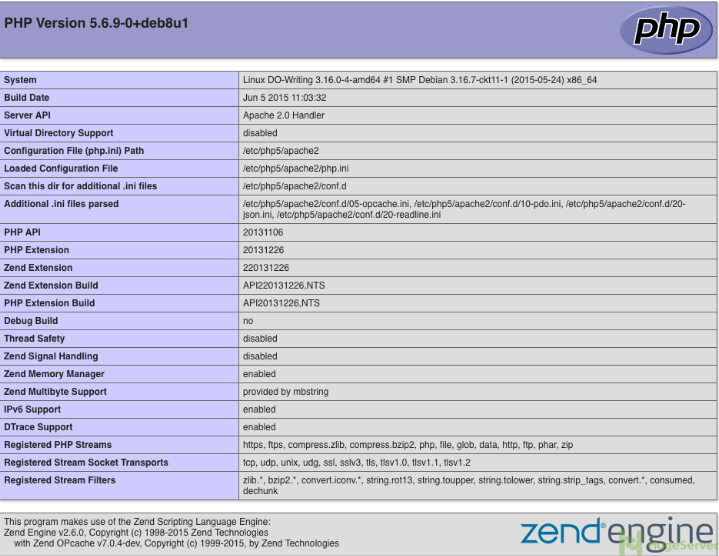
http://111.111.111.111/info.phpIf you've followed the steps correctly, you'll see a page displaying basic PHP information, similar to the one below:

When you're finished checking the test PHP page, it's important to remove it for security reasons. To do that, just run this command:
sudo rm -i /var/www/html/info.phpThe system will ask if you want to delete the test file you created. Say "yes" to remove it. Once that's done, you've finished installing PHP!
Conclusions:
Congratulations! You've successfully set up the basic LAMP stack on your server, which means you're ready to start building various websites and web applications. But that's just the beginning! There are plenty of ways to customize and expand your server's capabilities. If you want to learn how to keep your Linux server secure, check out "An Introduction to Securing Your Linux VPS."
And if you're interested in hosting multiple websites on your server, follow the Apache virtual hosts tutorial.
Ready to take your server to the next level? Let's dive in and explore!
